Top 10 Hidden Spots in Dust 2 You Need to Know
Dust 2 is one of the most iconic maps in the CS:GO universe, but while many players race through the open areas, there are numerous hidden spots that can provide tactical advantages. From lurking places to enticing ambush points, knowing these locations can significantly impact your gameplay. In this guide, we unveil the Top 10 Hidden Spots in Dust 2 that every player should be aware of to boost their game strategy and enhance their chances of winning.
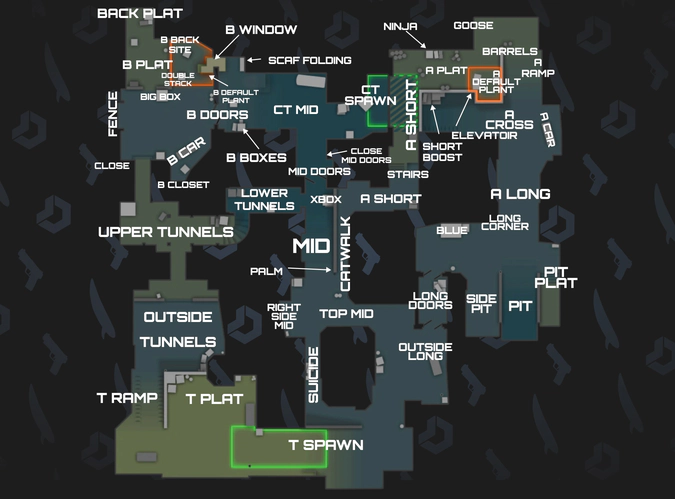
- The Box on B Site: This low-profile spot allows players to hide behind the boxes on B site, making it perfect for sneaky plays against unsuspecting opponents.
- Long A Pit: Nestled in the A Long Pit, players can surprise approaching enemies while being partially hidden in this deceptive location.
- Goose: Located near A site, the Goose spot offers excellent cover, providing players an opportunity to catch their adversaries off guard.
- Catwalk: While known to some, many underestimate how effectively players can use the corner of the Catwalk for surprise assaults.
- Terrorist Spawn: An unconventional choice, this position can be advantageous when the opposing team is unaware of players re-entering the action.
- Upper Tunnels: Hiding in Upper Tunnels allows you to stage a surprise attack on B site—a frequently overlooked tactic.
- Lower Tunnels: Similar to Upper Tunnels, but even less frequented, hiding here can create unexpected conflict for enemies moving toward B.
- Long A Platforms: The platforms overlooking A are dream spots for snipers waiting to catch off-guard opponents.
- Middle Boxes: In the center of the map, these boxes are excellent for ambushing players crossing mid.
- Close to CT Spawn: This lesser-used area close to CT spawn can be invaluable when retreating to defend or launching a surprise flank.
Counter-Strike is a popular first-person shooter game that has captivated millions of players worldwide. Players join either the terrorist or counter-terrorist team to compete in various objective-based game modes. If you're experiencing issues with your gameplay, such as lag, you might want to learn how to fix packet loss cs2 for a smoother experience.
Mastering Dust 2: Essential Tips for Navigating Like a Pro
Mastering Dust 2 requires a keen understanding of the map's layout and strategic positioning. Start by familiarizing yourself with key areas such as Bombsite A and Bombsite B. To gain an advantage, mastering common chokepoints like Middle and Long A is crucial. Here are some essential tips to navigate effectively:
- Utilize smoke grenades to block enemy vision in critical areas.
- Communicate with your team to coordinate attacks and throws.
- Practice common peeking techniques to minimize exposure to enemy fire.
Another critical aspect of Mastering Dust 2 is understanding the importance of economy management. Knowing when to buy, save, or force-buy can often be the difference between victory and defeat. Keep an eye on your team's economy and make sound decisions regarding equipment purchases. Additionally, positioning yourself based on your team's strategy can lead to a more successful game:
“Positioning isn't just about where you are on the map, but how well you complement your teammates’ actions.”
What Are the Best Strategies for Flanking on Dust 2?
Flanking on Dust 2 requires a strategic approach to outmaneuver your opponents. One of the best strategies is to use the geography of the map to your advantage. For instance, players should communicate effectively with their team to coordinate flanks through Long A or Catwalk. It's crucial to take control of these areas while minimizing exposure to enemy fire. Use smoke grenades to obscure sightlines and distract opponents, allowing your teammates to execute their main attack while you go behind enemy lines.
Another effective strategy involves utilizing mid control to create opportunities for flanking. By pushing through Mid towards either B Site or A Site, you can catch opponents off guard, especially if they are focused on defending the primary angles. After gaining control of Lower Tunnels, always be ready to communicate your findings with your team. Remember, successful flanking relies on timing and awareness, so always keep an eye on your mini-map and listen for audio cues to gauge enemy movements.